


SmartPi manual
FAQs
Yes. Current clamps with a 1A secondary current, e.g. 500/1A, can also be used. To do so, you must reposition the jumper in the SmartPi.
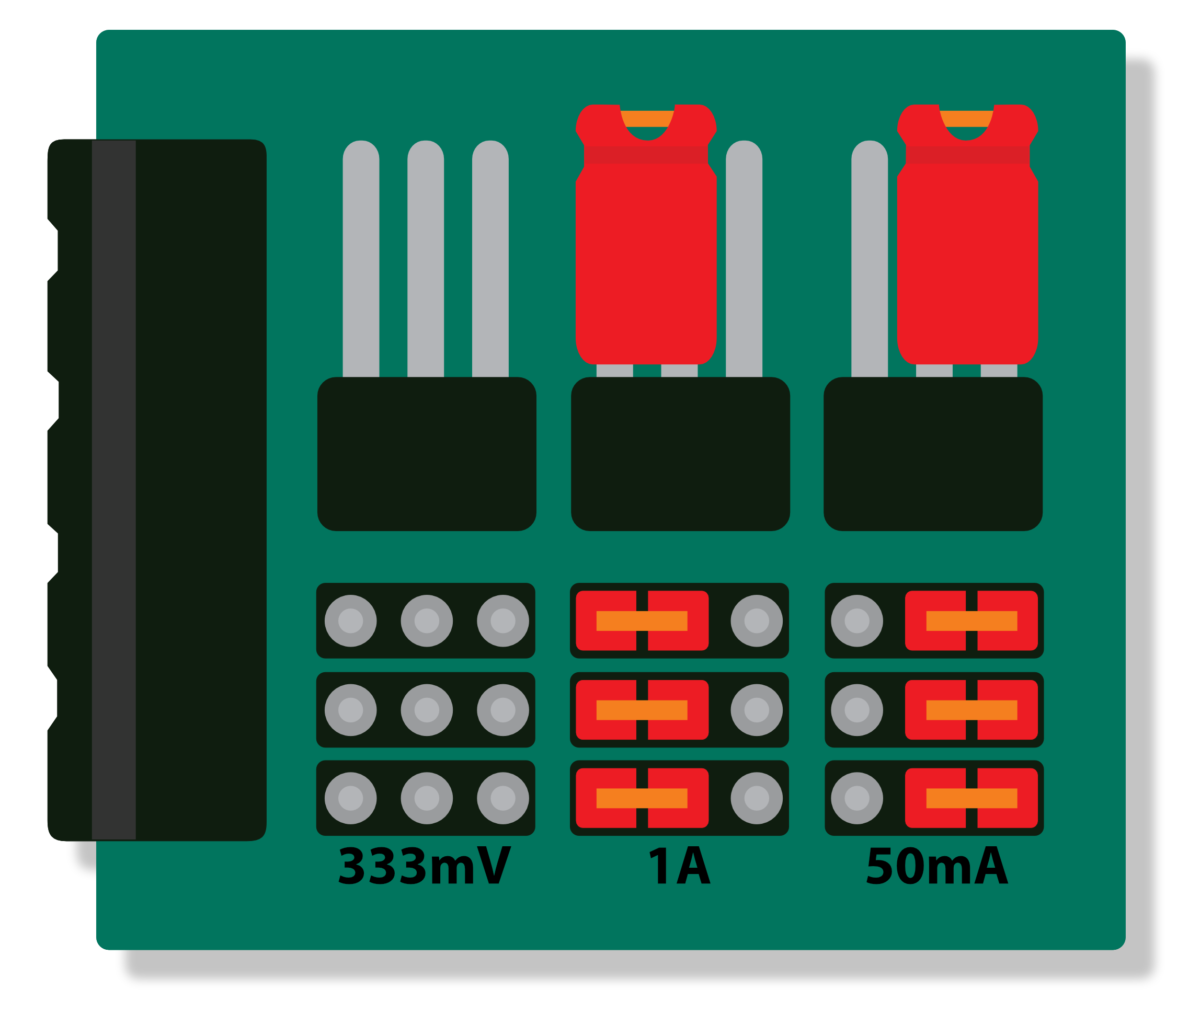
Yes, that is possible.
After each measurement (default: 1 second), the smartpireadout process writes the measurement data to a shared file (default: /var/tmp/smartpi/smartpi_values). You can then read this data directly and process it further.
The measured values are timestamped and separated by semicolons.
Timestamp;Strom L1 (A);Strom L2 (A); Strom L3 (A); Strom N (A); Spannung L1-N (V); Spannung L2-N (V);Spannung L3-N (V); Leistung L1 (W); Leistung L2 (W); Leistung L3 (W); COS PHI L1; COS PHI L2;COS PHI L3; Frequenz L1 (Hz); Frequenz L2 (Hz); Frequenz L3 (Hz); Energie balanced (Wh);
No. Only AC can be measured.
For some time now, the SmartPi has used InfluxDB as its database. Older SmartPis used the SQLite database.
However, the old SQLite data can be converted.
To do so, copy the SQLite files (usually located in /var/smartpi/db) from the old SmartPi image to the SmartPi with the new image. The best way to do this is to copy the files from the old image via SSH and then copy them to the new image via SSH as well.
Do not rename the files.
Using the command smartpisqlite2influxdb <Pfad_zur_SQLite-Datei>
you can import the files.
Example: smartpisqlite2influxdb /home/smartpi/smartpi_logdata_202411.db
The SmartPi is set to DHCP. If no DHCP server (router) is connected, the SmartPi gets a fallback IP address. Set your laptop to DHCP and connect it to the SmartPi. You can then reach the SmartPi at the IP address http://169.254.3.10.
In the latest version, there is no graphical user interface via HDMI. You can easily install it afterwards.
Connect the SmartPi to the router.
Log in via SSH.
sudo apt-get updatesudo apt-get install --no-install-recommends xserver-xorg xinitsudo apt-get install raspberrypi-ui-modssudo apt install chromium-browsersudo raspi-config
1 System Options
S5 Boot / Auto Login
B4 Desktop Autologinsyncsudo reboot
Bookworm version (since December 2023)
In the web browser, click the menu and then the last item. A new window opens. Log in there with the smartpi account.
sudo nmcli -p connection show
This displays the connection name of the network interface. In the German version, it is “Kabelgebundene Verbindung 1”; in the English version, it is “Wired connection 1”.
=====================================
NetworkManager connection profiles
=====================================
NAME UUID TYPE DEVICE
--------------------------------------------------------------------------------------------------------------------------
Kabelgebundene Verbindung 1 9ed94e73-900d-3f46-937d-eaeab37c8322 ethernet eth0
lo cfc15056-7919-440f-886c-8333326888ef loopback lo
Then enter the IP address (192.168.178.111), gateway (192.168.178.1) and DNS (192.168.178.1) and restart the service
sudo nmcli c mod "Kabelgebundene Verbindung 1" ipv4.addresses 192.168.178.111/24 ipv4.method manual
sudo nmcli con mod "Kabelgebundene Verbindung 1" ipv4.gateway 192.168.178.1
sudo nmcli con mod "Kabelgebundene Verbindung 1" ipv4.dns "192.168.178.1"
sudo nmcli c down "Kabelgebundene Verbindung 1" && sudo nmcli c up "Kabelgebundene Verbindung 1"
Re-enable DHCP
sudo nmcli con modify "Kabelgebundene Verbindung 1" ipv4.method auto
sudo nmcli c down "Wired connection 1" && sudo nmcli c up "Kabelgebundene Verbindung 1"
Buster version
To set a static IP address, you must log in via SSH. The best way to do this is with the PuTTY program. Check in your router which IP address the SmartPi has. Open PuTTY and log in to the SmartPi.
sudo nano /etc/dhcpcd.conf
In the lower part, you will find the section # Example static IP configuration:
Remove the # as shown in the example and adjust the IP address.# Example static IP configuration:interface eth0static ip_address=192.168.178.10/24#static ip6_address=fd51:42f8:caae:d92e::ff/64static routers=192.168.178.1static domain_name_servers=192.168.178.1 8.8.8.8 Save and close with CTRL+O and CTRL+C.syncreboot
Before you can use the RS485, you must first change some settings. Log in to the SmartPi via SSH.
sudo nano /boot/cmdline.txt
there, remove
console=/dev/serial1
and
console=serial0,115200
save with CTRL+O and close with CTRL+C
sudo nano /boot/config.txt
add the two lines at the end
dtoverlay=pi3-miniuart-bt
enable_uart=1
core_freq=250
save with CTRL+O and close with CTRL+C
syncsudo reboot
You can now use the RS485 bus via /dev/serial0.
3 clamps. You only need the 4th clamp for the neutral conductor if you want to measure unbalanced loads.
The 4th clamp can only be connected to the SmartPi 3.1.
approx. 80mW; with the Raspberry Pi, approx. 5-7W depending on the configuration
| Register | Name | Unit | Type |
| 0/1 | Current L1 | A | float32 |
| 2/3 | Current L2 | A | float32 |
| 4/5 | Current L3 | A | float32 |
| 6/7 | Current N | A | float32 |
| 8/9 | Voltage L1-N | V | float32 |
| 10/11 | Voltage L2-N | V | float32 |
| 12/13 | Voltage L3-N | V | float32 |
| 14/15 | Power L1 | W | float32 |
| 16/17 | Power L2 | W | float32 |
| 18/19 | Power L3 | W | float32 |
| 20/21 | COS PHI L1 | float32 | |
| 22/23 | COS PHI L2 | float32 | |
| 24/25 | COS PHI L3 | float32 | |
| 26/27 | Frequency L1 | Hz | float32 |
| 28/29 | Frequency L2 | Hz | float32 |
| 30/31 | Frequency L3 | Hz | float32 |
| 32/33 | Energy balanced | Wh | float32 |
Request
http://<ip>/api/v1/smartpiac/livedataResponse
{
"serial": "00000000c69bb6de", // Seriennummer
"name": "SmartPi 00000000c69bb6de", // Name (In der Weboberfläche änderbar)
"lat": 52.3192358, // Breitengrad (In der Weboberfläche änderbar)
"lng": 9.7189549, // Längengrad (In der Weboberfläche änderbar)
"time": "2025-05-08 09:35:03", // Aktuelle Uhrzeit
"softwareversion": "", // Software Version
"ipaddress": "192.168.69.110", // IP Adresse
"datasets": [ // Daten
{
"time": "2025-05-08 09:35:03", // Uhrzeit des Datensatzes
"phases": [ // Phasen
{
"phase": 1, // Phasen Nummer 1
"name": "phase 1", // Phasen Name
"values": [ // Messwerte
{
"type": "current", // Strom
"unity": "A", // Einheit
"info": "",
"data": 0 // Messwert
},
{
"type": "voltage", // Spannung
"unity": "V", // Einheit
"info": "",
"data": 230 // Messwert
},
{
"type": "power", // Leistung
"unity": "W", // Einheit
"info": "",
"data": 0 // Messwert
},
{
"type": "cosphi", // cos phi
"unity": "",
"info": "",
"data": 1 // Messwert
},
{
"type": "frequency", // Frequenz
"unity": "Hz", // Einheit
"info": "",
"data": 50.01 // Messwert
},
{
"type": "energyconsumed", // Wh Bezug
"unity": "Wh", // Einheit
"info": "",
"data": 0 // Messwert
},
{
"type": "energyproduced", // Wh Einepeisung
"unity": "Wh", // Einheit
"info": "",
"data": 0 // Messwert
},
{
"type": "energybalanced", // Wh Bilanziert
"unity": "Wh", // Einheit
"info": "",
"data": 0 // Messwert
}
]
},
{
"phase": 2, // Phasen Nummer 2
"name": "phase 2",
"values": [
{
"type": "current",
"unity": "A",
"info": "",
"data": 0
},
{
"type": "voltage",
"unity": "V",
"info": "",
"data": 230
},
{
"type": "power",
"unity": "W",
"info": "",
"data": 0
},
{
"type": "cosphi",
"unity": "",
"info": "",
"data": 1
},
{
"type": "frequency",
"unity": "Hz",
"info": "",
"data": 150.49971
},
{
"type": "energyconsumed",
"unity": "Wh",
"info": "",
"data": 0
},
{
"type": "energyproduced",
"unity": "Wh",
"info": "",
"data": 0
},
{
"type": "energybalanced",
"unity": "Wh",
"info": "",
"data": 0
}
]
},
{
"phase": 3, // Phasen Nummer 3
"name": "phase 3",
"values": [
{
"type": "current",
"unity": "A",
"info": "",
"data": 0
},
{
"type": "voltage",
"unity": "V",
"info": "",
"data": 230
},
{
"type": "power",
"unity": "W",
"info": "",
"data": 0
},
{
"type": "cosphi",
"unity": "",
"info": "",
"data": 1
},
{
"type": "frequency",
"unity": "Hz",
"info": "",
"data": 138.90396
},
{
"type": "energyconsumed",
"unity": "Wh",
"info": "",
"data": 0
},
{
"type": "energyproduced",
"unity": "Wh",
"info": "",
"data": 0
},
{
"type": "energybalanced",
"unity": "Wh",
"info": "",
"data": 0
}
]
},
{
"phase": 4, // Phasen Nummer 4, nur bei SmartPi 2.0 und 3.1
"name": "phase 4",
"values": [
{
"type": "current",
"unity": "A",
"info": "",
"data": 0
}
]
}
]
}
]
}If you use our image,
from Bullseye (from June 2022)
- User name: smartpi
- Password: smart4pi
Stretch/Buster (no longer current)
- User name: pi
- Password: smart4pi
are the login credentials for all web pages and interfaces.
If no voltage is connected, the direction of current flow cannot be measured. So if you only want to measure consumption, this is sufficient. However, a voltage of 230V is then assumed for the power calculation, which can lead to measurement tolerances.
You can also set a different voltage to be assumed in the interface.

To switch off voltage measurement, go to the settings under Measurement -> Voltage measurement and deactivate the measurement for the relevant phases. Under Assumption, you can set the voltage to be used for the calculations.
If you do not connect the 230V, the SmartPi must be powered by a USB power supply.
The SmartPi is set to DHCP. If your router supports local name resolution, you can access the SmartPi at https://smartpi or http://smartpi. Otherwise, check in your router which IP address the SmartPi has been assigned.
The jumper activates the termination resistor on the RS485 bus.
By default, a measurement is taken every second. You can adjust the sampling rate per second in /etc/smartpi. In the section [device], change or add the entry samplerate . You can set the sampling rate to a value between 1 and 4.
Every second:
[device]samplerate = 1
4 times per second:
[device]samplerate = 4
If you want, you can adjust the sampling rate yourself in the source code. Querying all values takes approx. 175ms. Without the frequency, it takes approx. 20 ms. This means you can perform approx. 50 queries per second.
K is white and s or L is red.
You can find the latest image for the SmartPi at
https://files.enerserve.eu/smartpi/smartpi_bookworm_arm64.7z
for download.
For information on how to copy the image to the SD card, see:
https://enerserve.eu/help-service/smartpi/softwareinstallation/#download-smartpi
50 Hz and 60 Hz. The 60 Hz measurement must be enabled in the config.
The basic functions require +5V, +3.3V, ground and I2C (SCL, SDA).
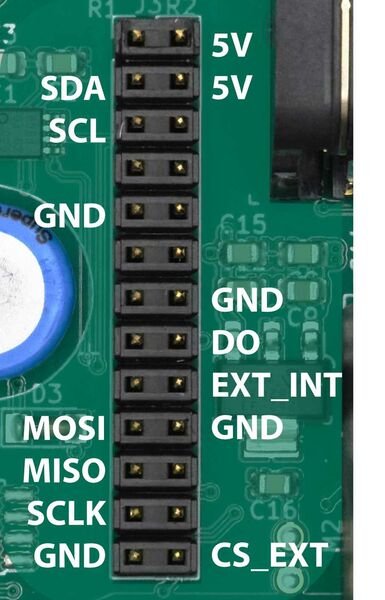
P1 = Power phase 1
P2 = Power phase 2
P3 = Power phase 3
Ptot = Power total
V1 = Voltage phase 1
V2 = Voltage phase 2
V3 = Voltage phase 3
I1 = Current phase 1
I2 = Current phase 2
I3 = Current phase 3
I4 = Current phase N (only if the SmartPi has a connection for it)
COS1 = Cos phi phase 1
COS2 = Cos phi phase 2
COS3 = Cos phi phase 3
F1 = Frequency phase 1
F2 = Frequency phase 2
F3 = Frequency phase 3
Ec1 = Energy phase 1 import
Ep1 = Energy phase 1 feed-in
Ec2 = Energy phase 2 import
Ep2 = Energy phase 2 feed-in
Ec3 = Energy phase 3 import
Ep3 = Energy phase 3 feed-in
The 230V is used to measure the direction of current flow (import and export).
At the same time, the SmartPi is powered via L1.
If you do not connect the 230V, the SmartPi must be powered by a USB power supply.